This post demonstrates performing a “rebase” on your Mercurial repository using TortoiseHg. Rebasing your commits, instead of merging, can help keep your Mercurial history much easier to follow, with fewer “merge polygons” in your commit graph. I assume you have TortoiseHg installed, and have a basic working knowledge of Mercurial including pushing, pulling, and merging.
When working with a distributed verion control system like Mercurial or Git, some teams choose to have multiple developers work on the same branch. (Let’s sidestep the debates about whether or not that’s a good idea, and just recognize that it’s a common practice.)
For teams working this way, it’s common that you try and push your recent changes to the central repository, only to find that someone else has beaten you to the punch. This creates a fork in your repository path (called an “anonymous branch”, for reasons I’ll explain later) that needs to be resolved before you can push your changes.
It’s very common to resolve this problem by performing a merge. The goal of this post is to show you how to resolve the same situation by performing a rebase, which will help keep your repository history neat and tidy.
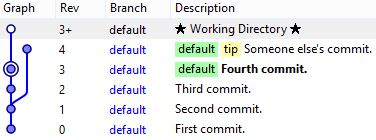
Rebasing lets you take a repository that looks like this…
…and change it to look like this:
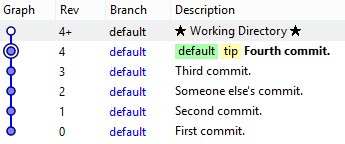
This tutorial will show you how to perform a rebase in a Mercurial repository using TortoiseHg. Of course, it’s possible to rebase from the command line. In fact, it’s typically far fewer steps. However, the command line can be a scary place for the uninitiated. My hope is that this post will make it easier for teams with varying levels of technical savvy to collaborate while keeping their repository history easy to read.
Before going down this path, let me emphasize that performing a rebase is not risk-free. You’re re-writing history in your repository. If you don’t know what you’re doing, it’s possible to unrecoverably lose your changes or otherwise seriously screw-up your team’s repository. This shouldn’t scare you away, but it should make you pay attention to what you’re doing. I compare it to driving a car. It’s possible to seriously harm yourself or others if you’re not careful while driving. But I still drive to work every day.
I have two rules for rebasing safely.
- Never, ever rewrite history that’s been shared with others. If a commit is in the central repository, it’s off limits. Period.
- If you’re not 100% confident that a rebase will succeed, choose to “Keep original changesets”. (I’ll explain what that means later on.)
How We End Up in This Situation (or, “It’s All Bob’s Fault”)
Let me set the stage. You’re working in your local repository, and there have already been a few commits that you’ve pulled in from the central repository (two, in the screenshot below).

You finish the changes you’ve been working on, and commit them to your local repository (the third and fourth commits in the following screenshot).
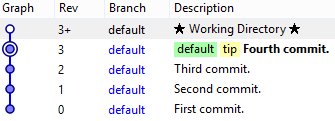
But when you go to push your new commits to your team’s central repository, Tortoise stops you with message saying you shouldn’t create “multiple heads” in the remote repository. This means someone else has pushed new changes to the central repository before you did. (Let’s blame it on your freakishly productive co-worker, Bob.) To better visualize the state we’re in, let’s pull those changes down to your local repository. After doing so, your commit graph looks something like the following:

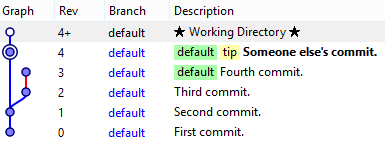
See that split in the repository graph? Your changes (“Third commit.” and “Fourth commit.”) are on one path, and Bob’s commit appeared on a separate path. The ‘default’ branch now has two “heads” (thus the “multiple heads” warning when you tried to push your changes). Right now, the central repository only has three commits (the first two, plus Bob’s) and a single head. If you were allowed to push your changes, the central repository would end up in the same state that your local repository is now in… with multiple heads on the ‘default’ branch. Mercurial has no problem letting your local repository have multiple heads, but it expects you to resolve the situation before pushing changes elsewhere.
Hopefully it’s obvious why this is a problem. We don’t want future developers to have to choose between Bob’s changes and yours. We want everyone’s changes pulled together into a single path that future developers (like you!) can build on. So how do we get there?
Option 1: Merge
The way most people learn to resolve this error is to perform a merge. It’s the easiest solution to understand, and it’s a perfectly acceptable one too. You shouldn’t feel bad if this is your normal practice.
The following screenshot shows our example repository after merging the two anonymous branches together. (They’re called “anonymous” because neither of the paths were given a unique branch name.)
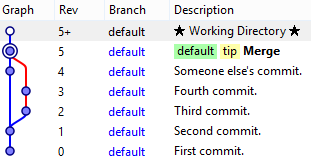
As I said, merging is nice because it’s easy to understand and is pretty easy to do. Additionally, when the merge includes a named feature branch, it can be useful to preserve this separation in the repository’s history as useful context about those commits.
However, if a feature branch is not involved (and especially if your anonymous branch only contains a couple of commits), there’s no benefit in preserving knowledge of separate development paths in the repository’s history. And worse, when micro-merges like this become common, it can lead to some pretty serious repository clutter which makes it near impossible to understand what changes took effect and when.
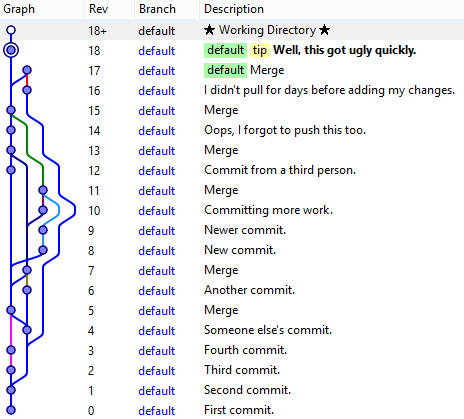
So what’s the alternative?
Option 2: Rebase
First things first. We’re going to use two new commands (Rebase and Strip) which aren’t accessible in Tortoise by default. They’re extensions that ship with TortoiseHg, so they’re already on your computer, but we have to enable them.
Open the Tortoise “Hg Workbench” and go to “File -> Settings -> Extensions”. You need to enable the “rebase” and “mq” extensions. Just check the two boxes, like in the screenshot below.
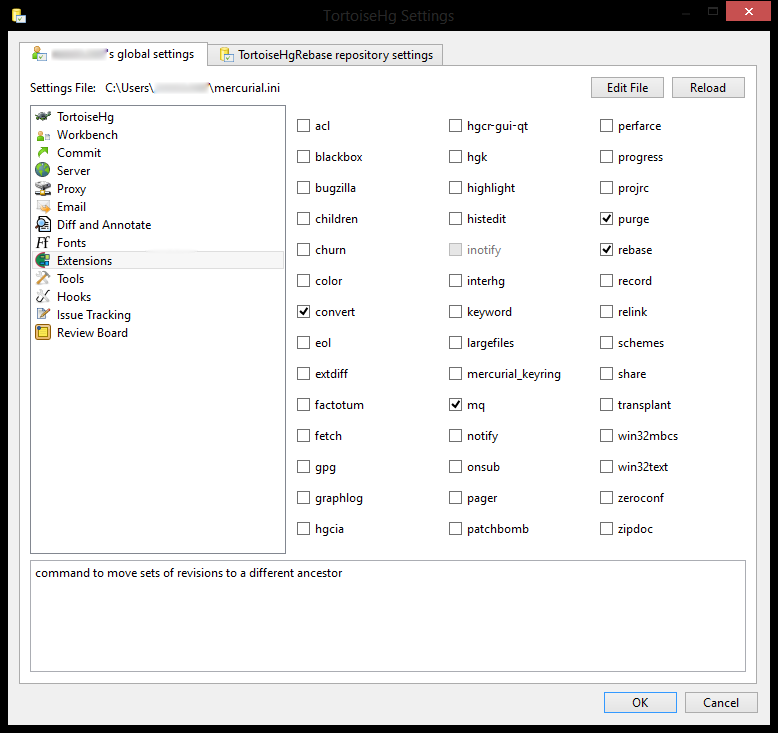
When you click OK, you’ll probably be prompted to restart TortoiseHg. Just close all Tortoise windows. The next time you open the Workbench, the new commands will be available.
The “rebase” extension gets us the “Rebase” menu command. The “mq” extension gets us the “Strip” menu command, as well as other MQ-related commands which we won’t use here.
OK, now let’s remember what our repository looks like prior to our rebase. Your working directory is updated to your “Fourth commit”, and you’ve just pulled in Bob’s pesky “Someone else’s commit”.

It’s important to remember that you want to relocate your own commits on top of Bob’s, not the other way around. Bob’s commit is already in the central repository. It’s written in stone, and is off limits. But right now, your commits only live on your box so you can rewrite that history without affecting anyone else.
The first step is to update your working directory to the head that already exists in the central repository; in this case, you should update to the commit from Bob which you’ve just pulled in.
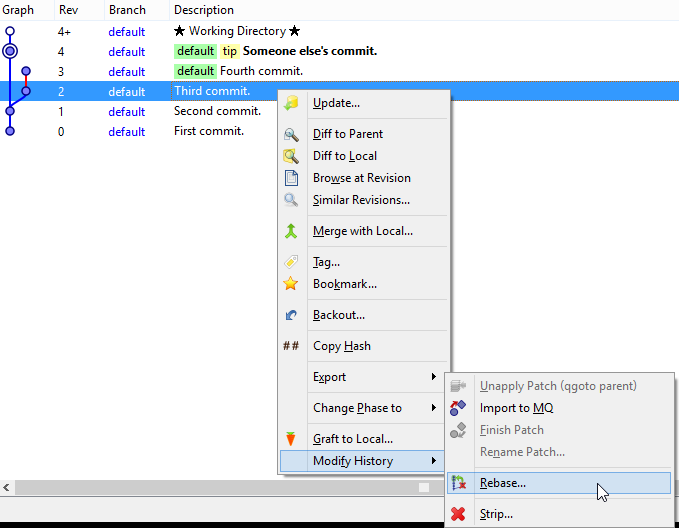
Next, highlight the earliest commit that you want to rebase (the once that starts the other anonymous branch). In our example, it’s the commit with the message “Third commit”. Right-click on it, and choose “Modify History -> Rebase…”.
This will bring up the Rebase dialog box.
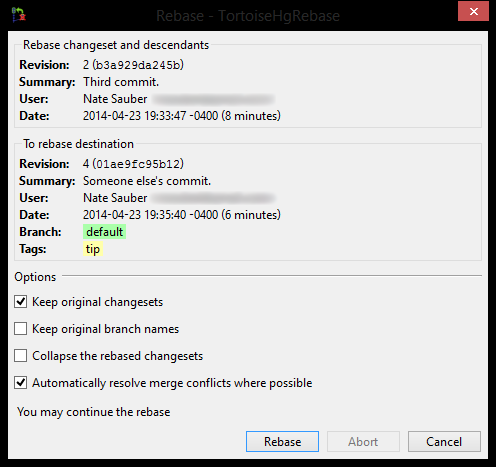
By default, none of the options are checked. The option worth paying special attention to here is “Keep original changesets”. By default, rebase will remove your rebased changes from their starting location and transplant them to their destination. This is a non-reversible change, and if anything goes wrong during the rebase you’re stuck. By checking “Keep original changesets”, rebase will make a copy of your changes at the destination, but won’t remove the originals from their starting location. This gives you the opportunity to delete your rebased commits and keep your originals if something goes wrong, but it also means you have to manually delete the original commits once you’ve verified the rebase is successful. I recommend you check this option if you have any uncertainty about whether your rebase will succeed (like right now, since this is your first rebase).
When you’re ready, click the “Rebase” button to start the magic. You may have to resolve some merge conflicts (as there’s still a merge happening under the covers). Once you do, you should end up with a repository looking something like this:
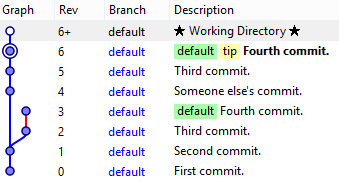
Notice that your commits (“Third commit” and “Fourth commit”) now appear twice. Great, that’s what you wanted! You ultimately want to keep the copies that were rebased on top of Bob’s commit, and remove the original ones that are still on their own anonymous branch. Once you’ve tested your code and verified everything is as it should be, you can “Strip” the original commits away.
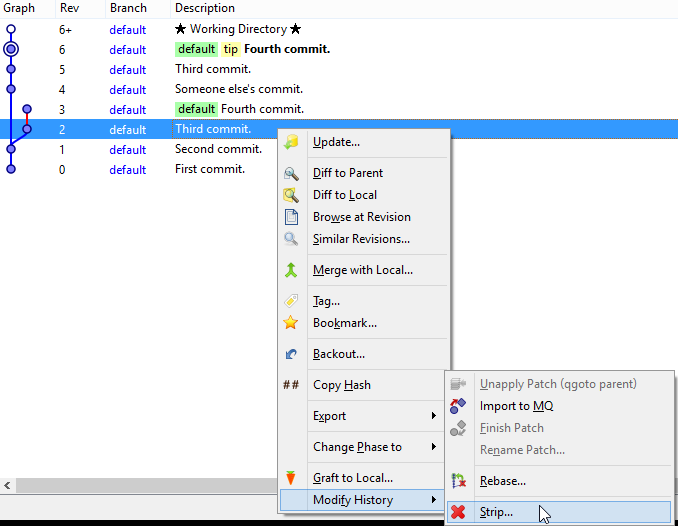
Right click on the earliest commit along your old anonymous branch (the same one you right-clicked on when performing the rebase), and choose “Modify History -> Strip…”.
This will bring up the Strip dialog box.
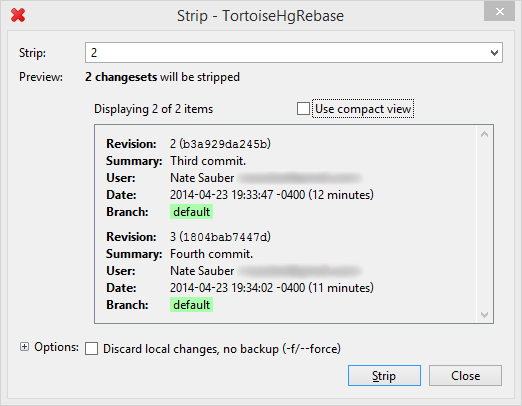
There are no options to check at this time, so just click the “Strip” button. Once the strip completes, your repository should look like this:

As you can see, you’ve resolved the “multiple heads” problem by transplanting your un-pushed commits on top of the latest head from the remote repository. There are no more awkward anonymous branches. Everything is now in one, easy to follow line.
Note that if you hadn’t checked the “Keep original changesets” option back in the Rebase dialog, you would have ended up here directly without having to perform a strip at all. Again, if you’re confident that you won’t have any complicated merge conflicts to deal with, that’s fine to do. But remember that you’re performing an unrecoverable change. “Keep original changesets” forces you to do some additional work, but it can also save you from tragedy when you least expect it.
Summary
The steps to perform a rebase using TortoiseHg are:
- Update your working directory to the head of other person’s anonymous branch (the one that you pulled from the central repository).
- Right-click on the first commit in your anonymous branch (the earliest commit that you haven’t pushed yet), and choose the “Rebase” command.
- Resolve any merge conflicts and verify your code behaves as expected.
- If you chose the “Keep original changesets” option:
- Right-click again on the first commit in your anonymous branch and choose the “Strip” command.
- You’re done!
Remember that rebasing is an advanced technique that rewrites history, and should be used carefully. If you rebase commits that have already been shared with others, you can cause some difficult problems for your team. But if you rebase your own commits before they’ve left your box, it can help make your repository history much easier to follow.
Enabling the “phase” column in the Tortoise Workbench’s commit log makes it more obvious which commits have been shared with others, and which haven’t. You can also take advantage of the wonderfully named “secret” phase to keep certain commits out of the central repository when you push (very useful when you’re bouncing between features, or if you have to drop your work-in-progress to make an emergency bug fix).
The “strip” command is also dangerous, but in an opposite manner as “Rebase”. Stripping changes that haven’t been pushed to the central repository means they’re gone forever. But if you strip changes that already exist in the central repository, you can always pull them back down again. If I’m feeling particularly OCD, I’ll sometimes use strip to re-order the commits in my recent history. But, of course, use with care!


